Importing card and bank statements
Import a company card or bank statement (CSV), turn each transaction into an expense and send it to QuickBooks. The company paid these, so they don't go into expense reports and nobody needs to be reimbursed.
Cards & Bank in the left menu is available to admins and owners.
How it works
- Import the statement CSV
- Turn each transaction into an expense (repeats of past ones are converted automatically)
- Check the automatic ones
- Submit for approval
- Send approved expenses to QuickBooks
1. Before you start
Add the card (once)
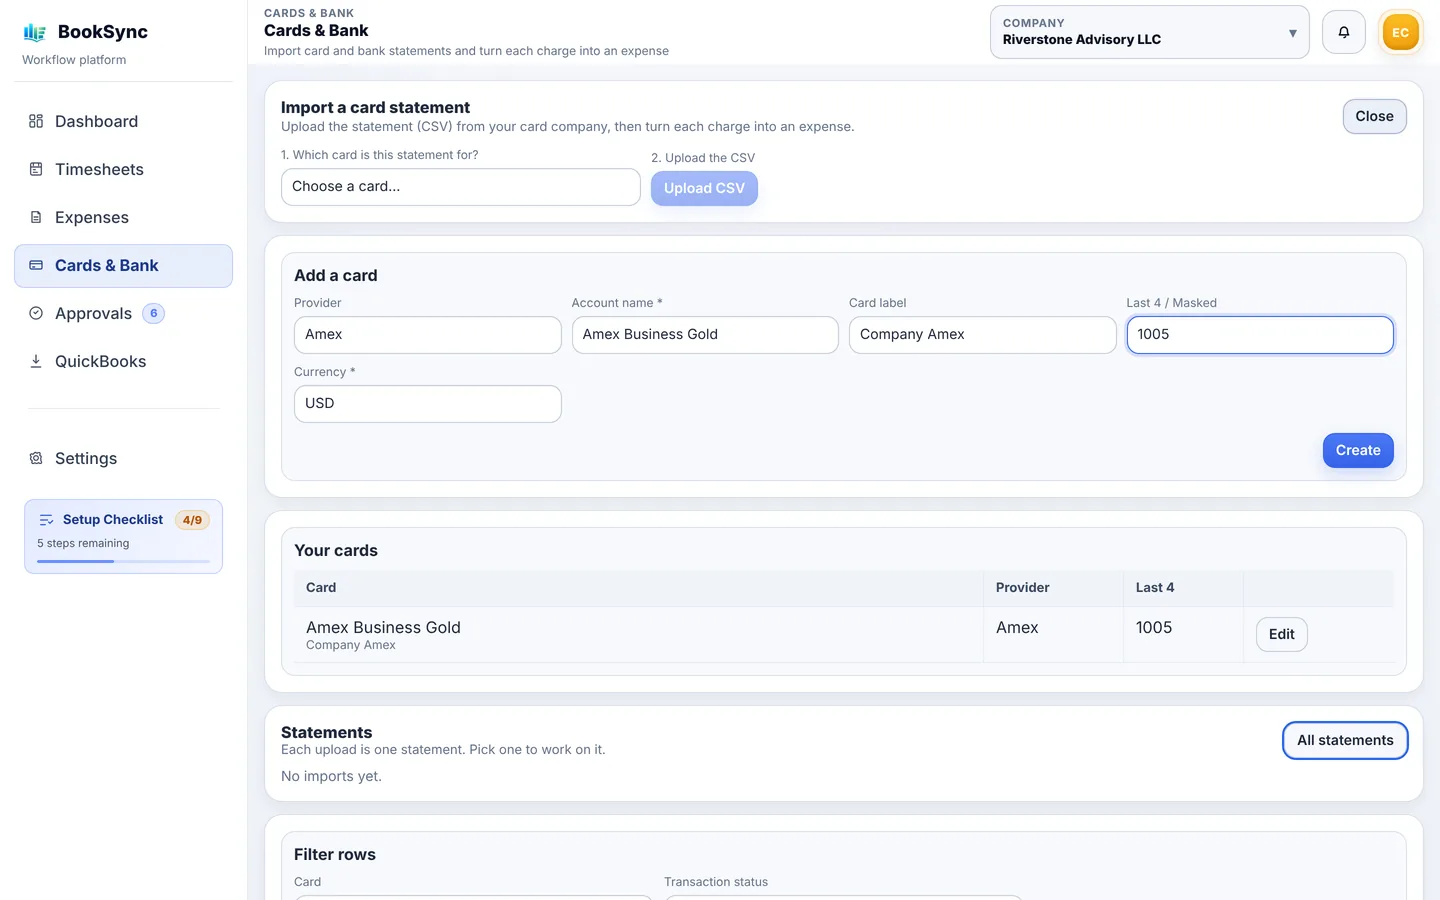
- In Cards & Bank, click Add a card at the top right.
- Enter the Provider (Amex, Chase and so on), Account name (for example, Amex Business Gold) and Last 4 digits of the card, then click Create.
- If QuickBooks is connected, choose the matching QuickBooks account under Paid with (QuickBooks). Expenses from this card get that account automatically.
Add the accounts first under Payment accounts in Settings → QuickBooks Connection.
Download the statement CSV
Download the statement as a CSV from your card or bank website. BookSync works out the columns on its own.
| Statement | Support |
|---|---|
| American Express | Works as is |
| Chase credit cards | Works as is |
| Chase checking and savings | Works as is. ACH, Zelle and check payments come in with the payee |
| Others | Works if it has date, amount and description (or merchant) columns |
Only CSV files are supported. Excel and PDF statements can't be imported.
2. Import the CSV
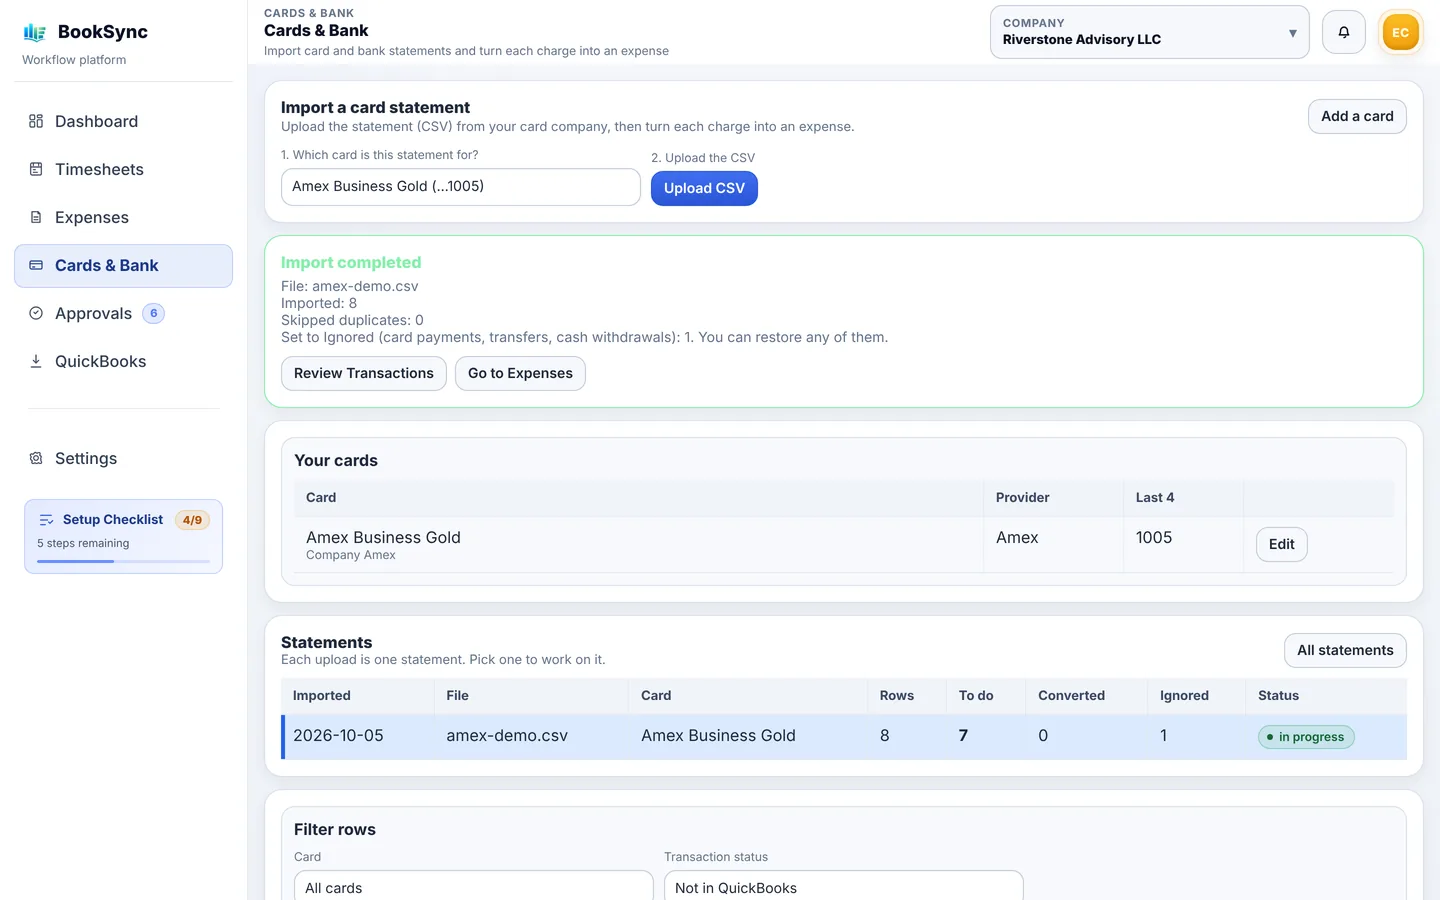
- Under 1. Which card is this statement for?, choose the card.
- Click Upload CSV and pick the file. It is imported right away.
- The result appears under Import completed.
| Message | Meaning |
|---|---|
| Imported | Number of transactions imported |
| Skipped duplicates | Already imported before, so skipped |
| Set to Ignored | Card payments, transfers, cash withdrawals and similar. Not expenses, so ignored automatically (you can restore them) |
| Filled automatically from past expenses | Matches past expenses, so converted automatically |
| Money received … left out | Deposits on a bank statement. Not expenses, so not imported |
Each import appears under Statements with counts such as To do and Converted, so you can see your progress. When everything is handled it shows ✓ All done.
3. Turn transactions into expenses
The transactions are listed one per row under the statement. Decide for each To do row whether to convert or ignore it. Buttons such as To do 7 filter by status.
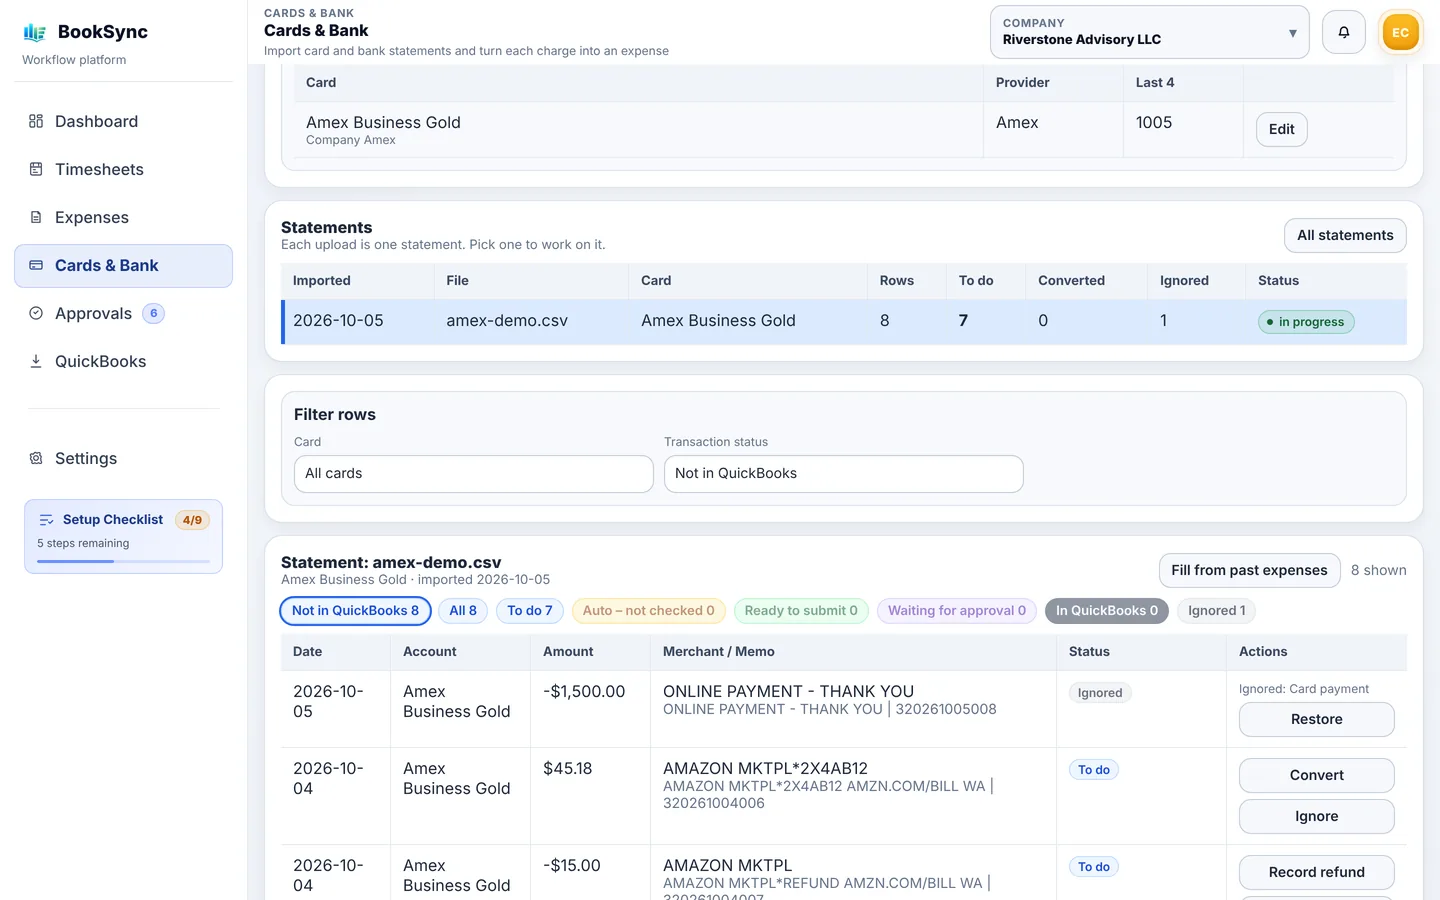
Convert
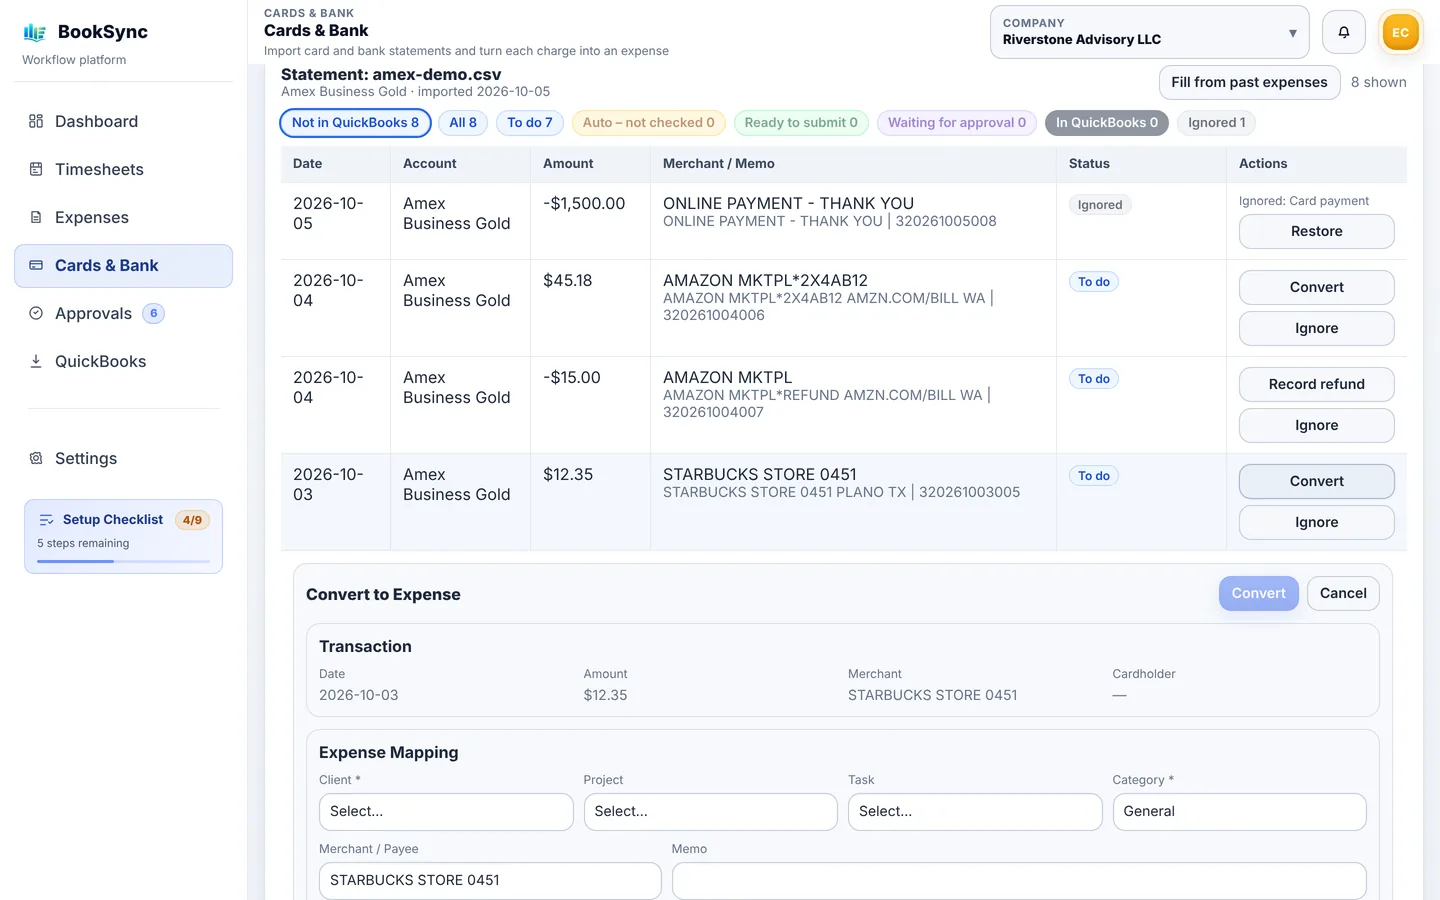
- Click Convert on the row to open Convert to Expense.
- Enter Client (required), Project, Category (required), Merchant / Payee and Memo.
- Click Convert at the top right. It's disabled until Client and Category are filled in.
What BookSync fills in from past expenses
- Payee: if the statement text (for example, WPSC-CO:23475150) matches a payee you chose before, it's filled in. If there are several, they appear under "Saved before as:"; similar names appear as "Did you mean …?". Click one to choose it.
- Category, memo and client: once a payee is chosen, these come from that payee's past expenses, preferring the same amount, then the same statement text, then the most recent.
- Paid with: the account set on the card.
Automatic conversion
Rows where the payee, category and client are clear from past expenses are converted as soon as they're imported, such as the same phone bill every month. New payees and refunds are never converted automatically, and one past expense isn't enough: at least two past expenses with the same amount, or the last three, must agree. When you have more history, click Fill from past expenses to run it again.
Not an expense (Ignore)
Click Ignore for personal charges or transfers that weren't caught automatically. Restore brings them back.
Refunds
Record a refund from a merchant (a negative row) with Record refund, using the same category as the original purchase. It goes to QuickBooks as a credit card credit.
4. Check and submit
Automatically converted rows are marked Auto – not checked and can't be submitted until someone checks them.
- If a row is right, click Looks right ✓. To confirm many at once, click Mark N auto rows as checked.
- To change something, click View / Edit, fix it and click Save (checked).
- Submit Ready to submit rows with Submit on the row, or all at once with Submit N for approval.
| Status | Meaning |
|---|---|
| To do | Not handled yet |
| Auto – not checked | Converted automatically, not checked yet |
| Ready to submit | Now an expense, ready for approval |
| Sent back | The approver sent it back. The reason is shown under the status |
| Waiting for approval | Submitted, waiting for approval |
| Ready for QuickBooks | Approved, not sent to QuickBooks yet |
| ✓ In QuickBooks | Sent to QuickBooks |
| Ignored | Ignored |
If you submitted a row yourself and it was approved automatically (for example as the owner), it shows Ready for QuickBooks and has an Undo approval button. It puts the expense back to Ready to submit so you can fix it and submit it again, or undo the convert. This is possible until it is sent to QuickBooks, and not in a locked month.
If a row is Sent back, fix it with View / Edit if needed, then click Resubmit to send it for approval again.
To undo a conversion, click Undo convert. The row goes back to To do and the expense is deleted. This isn't possible after it's sent to QuickBooks.
Card expenses are also listed by month under Expenses → Card & bank expenses. For approving them, see Approving time and expenses. When approving, set Source to Corporate Card only to see only card expenses.
5. Common questions
What if a statement overlaps last month's? Transactions you already imported are skipped as duplicates, so nothing is doubled. Importing under a different card is not treated as a duplicate, so pick the right card.
What if I paid the same amount at the same store twice on one day? On statements without a transaction ID, the second one may be skipped as a duplicate. If the count looks short, add it by hand under Expenses.
I imported the wrong file. Under Statements, click Delete import on that row. Its rows and the draft expenses made from them are deleted, and you can import the right file. The person who imported it or an admin can do this. It is refused while any expense from it is submitted, approved or sent to QuickBooks: send those back or delete them first.
What if the import fails? If any row has a date or amount that can't be read, the whole file is rejected. Fix the row shown in the error or download the CSV again. Save the file as UTF-8 CSV.
What about a closed month? After your company closes a month, its transactions can't be converted.
Can I change the date or amount? No. Card expenses keep the date and amount from the statement. If you converted the wrong row, use Undo convert.