Getting started
Follow these steps and your team will be ready to log time and expenses. This guide is for the company admin (owner) and takes about 30 minutes.
1. Create your account
Click Start free trial on booksync.ai to create your company workspace. The first 30 days are free.
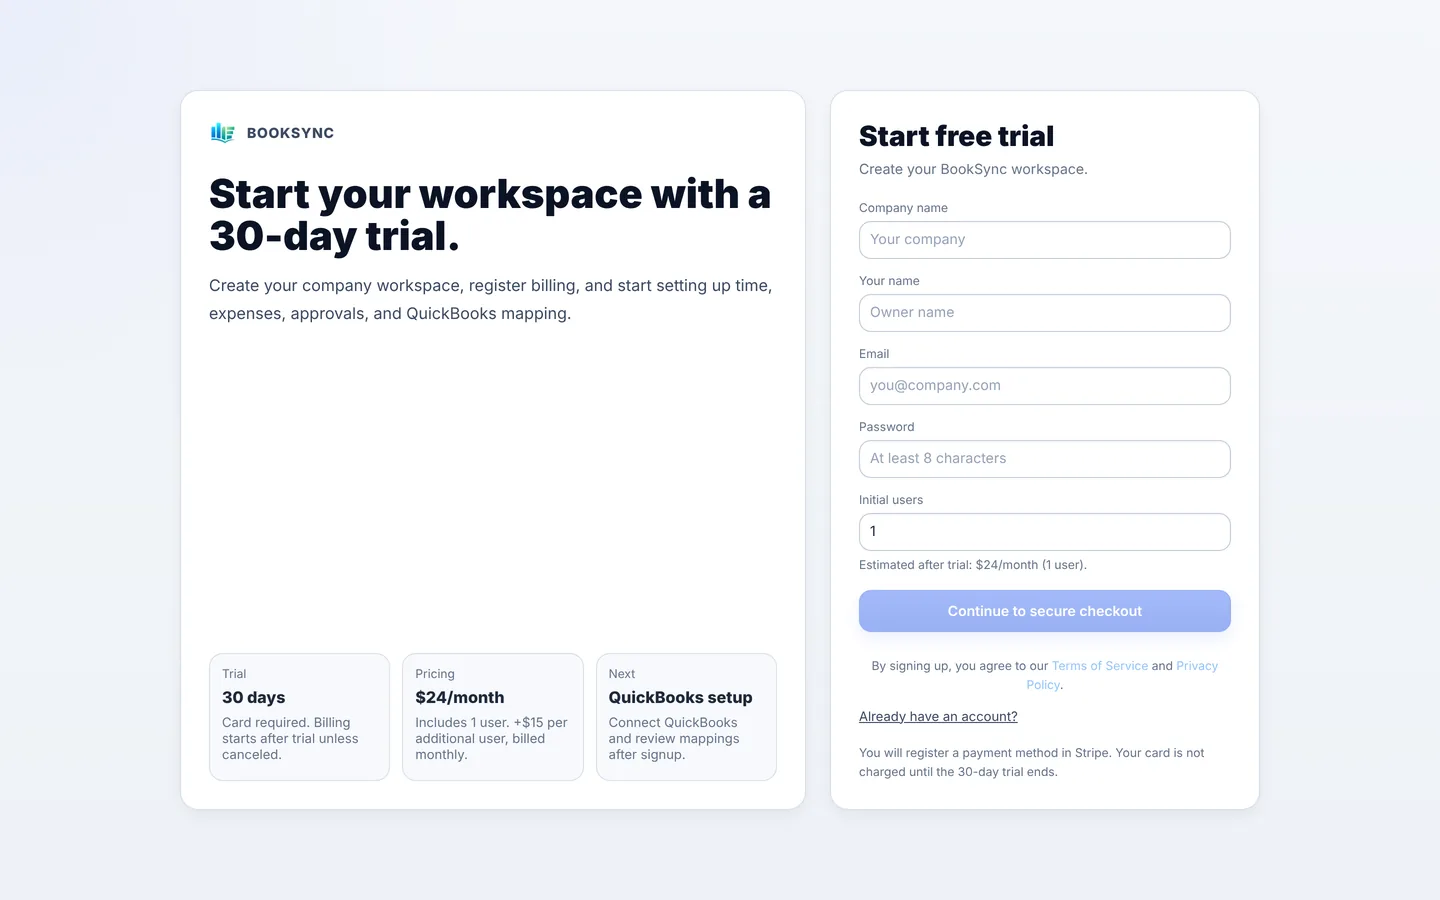
- Fill in:
- Company name
- Your name: you become the owner of this company
- Email and Password: used to log in. At least 8 characters.
- Initial users: how many people you expect. The estimated monthly price after the trial appears below. You can change this later.
- Click Continue to secure checkout and add a card on the Stripe page. You are not charged until the 30-day trial ends.
- When you are done, you return to BookSync.
Pricing is $24 per month including one user, plus $15 per month for each additional user. Cancel during the trial and you pay nothing.
After checkout, the Setup Checklist opens. Sections 2–6 of this guide follow the checklist in order. Click Open on an item to go to that setting; finished items are marked Done.
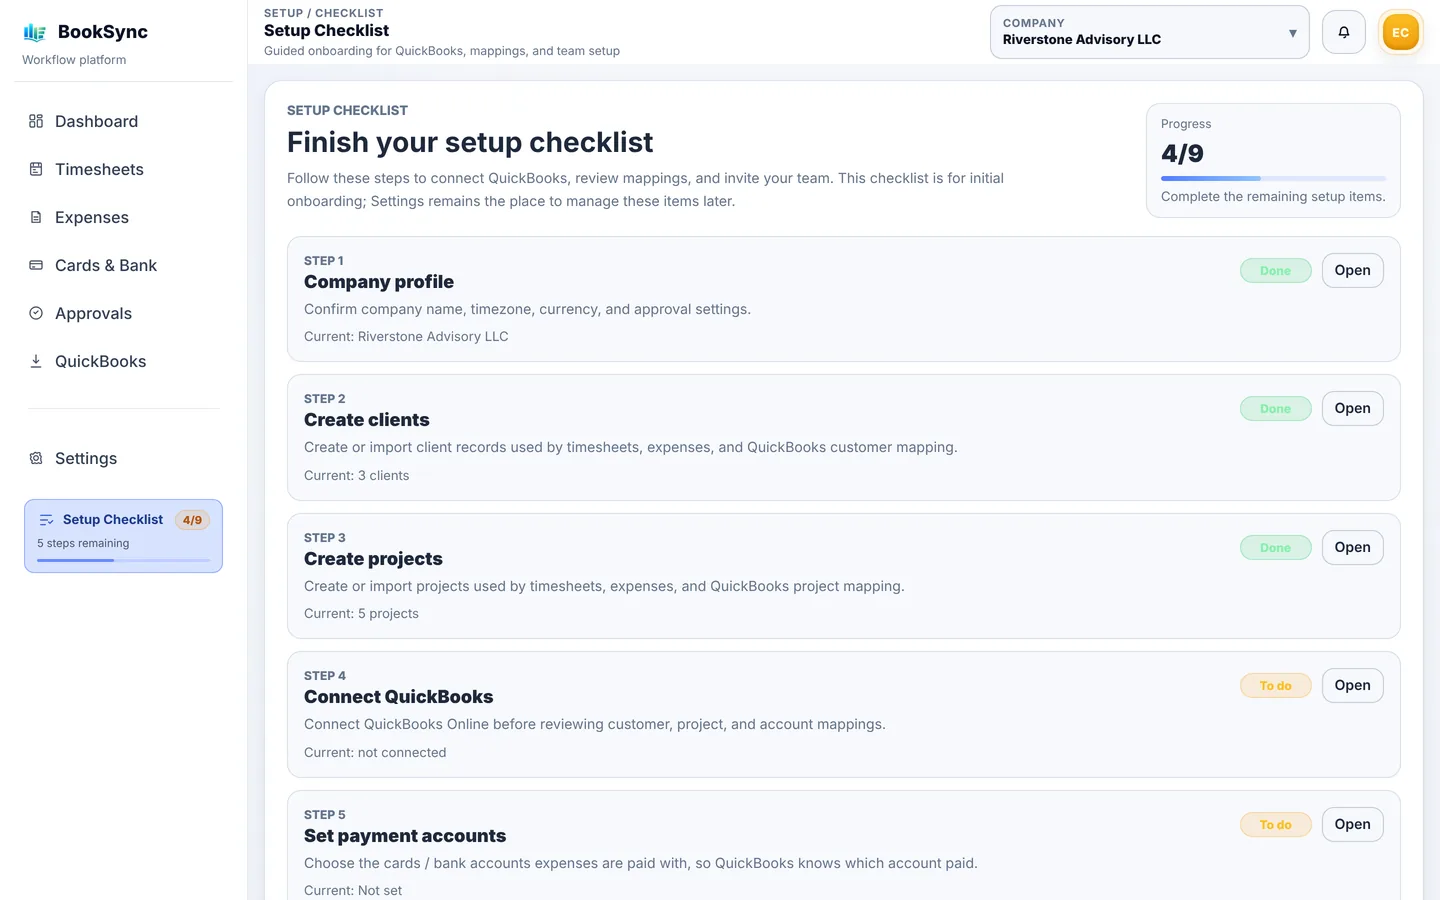
| This guide | Setup Checklist item |
|---|---|
| 2. Company settings | Company profile |
| 3. Clients and projects | Create clients / Create projects |
| 4. Connect QuickBooks | Connect QuickBooks / Set payment accounts / Map customers / Map projects / Map expense categories |
| 5. Add your team | Invite users |
| 6. Approval rules | Approval Policy in Company profile |
You can stop at any point. Open the checklist again from the left menu or from Settings.
2. Company settings
Go to Settings → Company Settings (Company profile in the checklist) to set the company name, currency, time zone and the features you use.
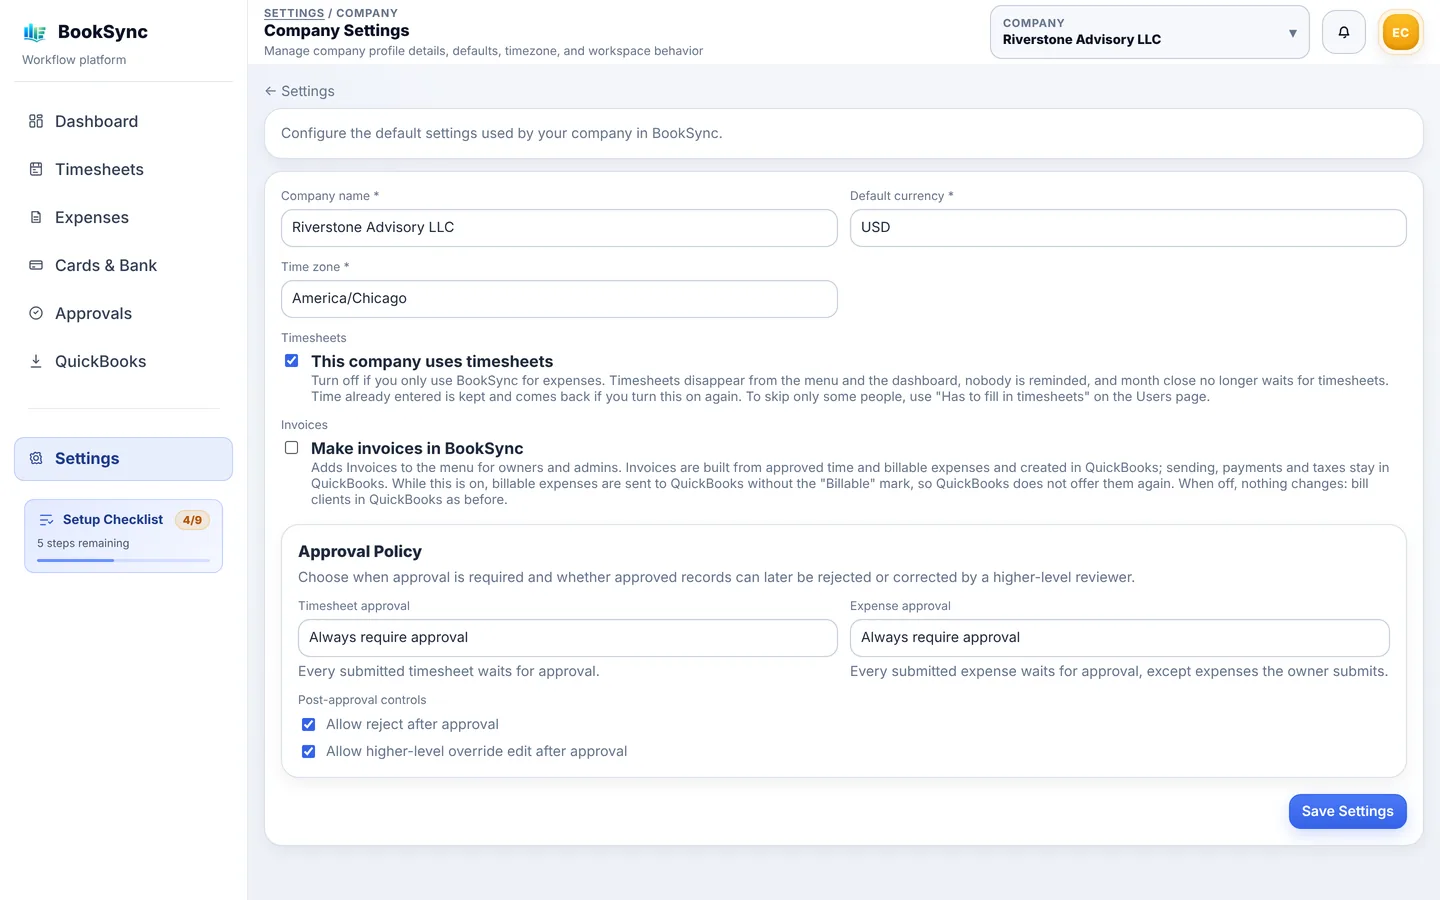
| Field | What to set |
|---|---|
| Company name | Filled in from sign-up |
| Default currency | The currency you normally use (USD in the US) |
| Time zone | Your company's time zone. Used to decide what "today" is and to date time entries |
| This company uses timesheets | Turn off if you only track expenses. Existing time entries are kept and come back when you turn it on again |
| Make invoices in BookSync | Turn on to create invoices from time. Leave off if you don't need it |
Approval Policy, further down the same page, is covered in section 6. Click Save Settings when you are done.
3. Add clients and projects
Every time entry and expense belongs to a client. Add your clients, and the projects under them, before your team starts.
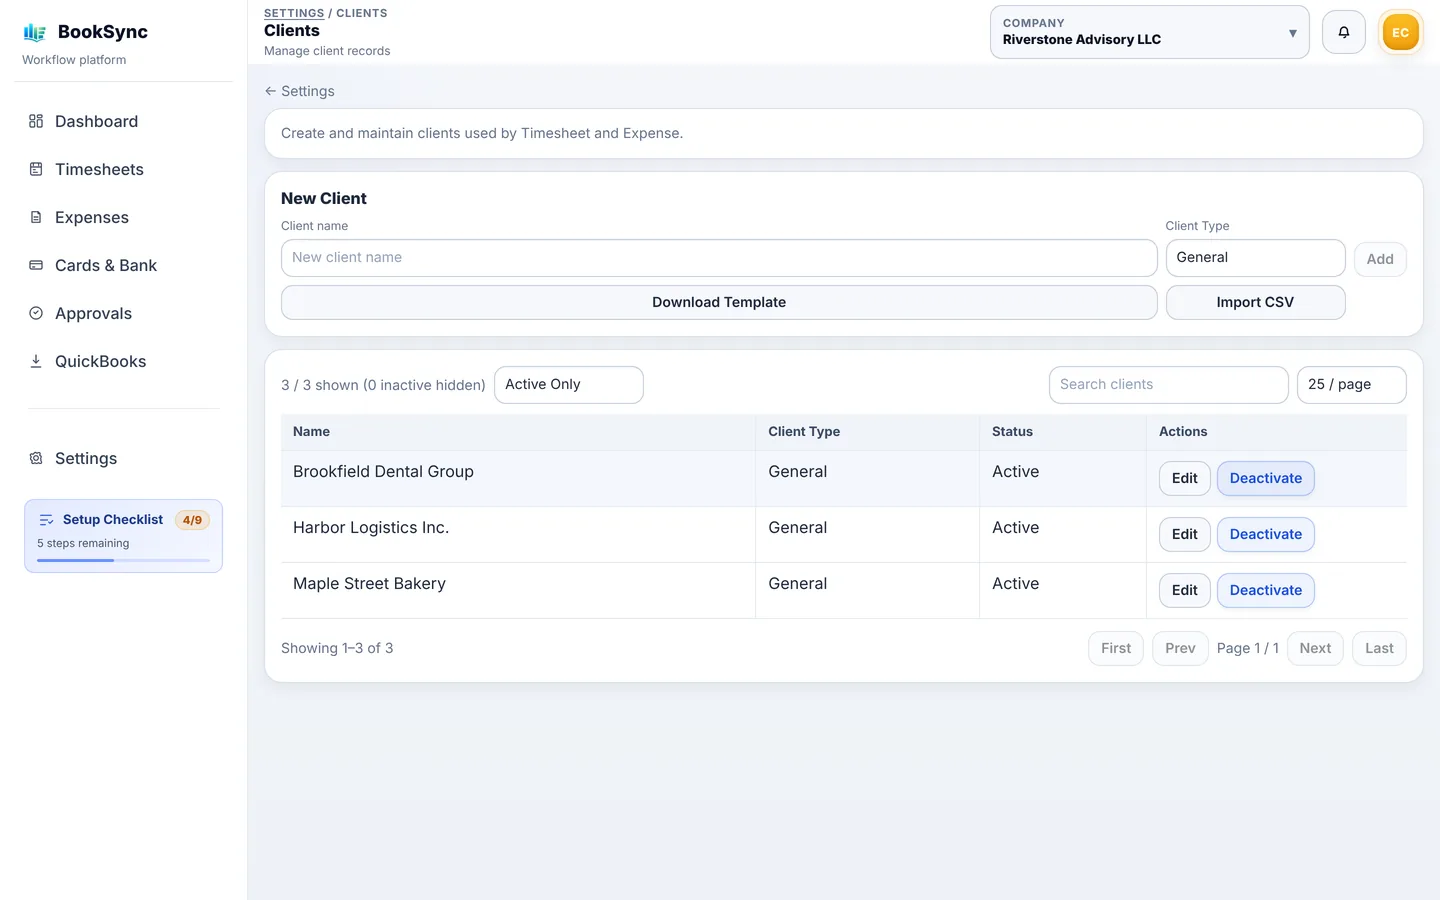
- Go to Settings → Clients & Projects.
- Client: type a name in New Client and click Add.
- Project: enter a project name, pick its client and add it. For example, "Monthly bookkeeping" and "2026 tax return" under "Brookfield Dental Group".
Have a lot of them? Click Download Template, fill in the CSV and click Import CSV.
Don't delete clients you no longer work with; click Deactivate. Past time and expenses stay, and the client no longer appears for new entries.
4. Connect QuickBooks Online
Once QuickBooks Online is connected, approved expenses go straight from BookSync into QuickBooks. You connect once and it stays connected until you disconnect.
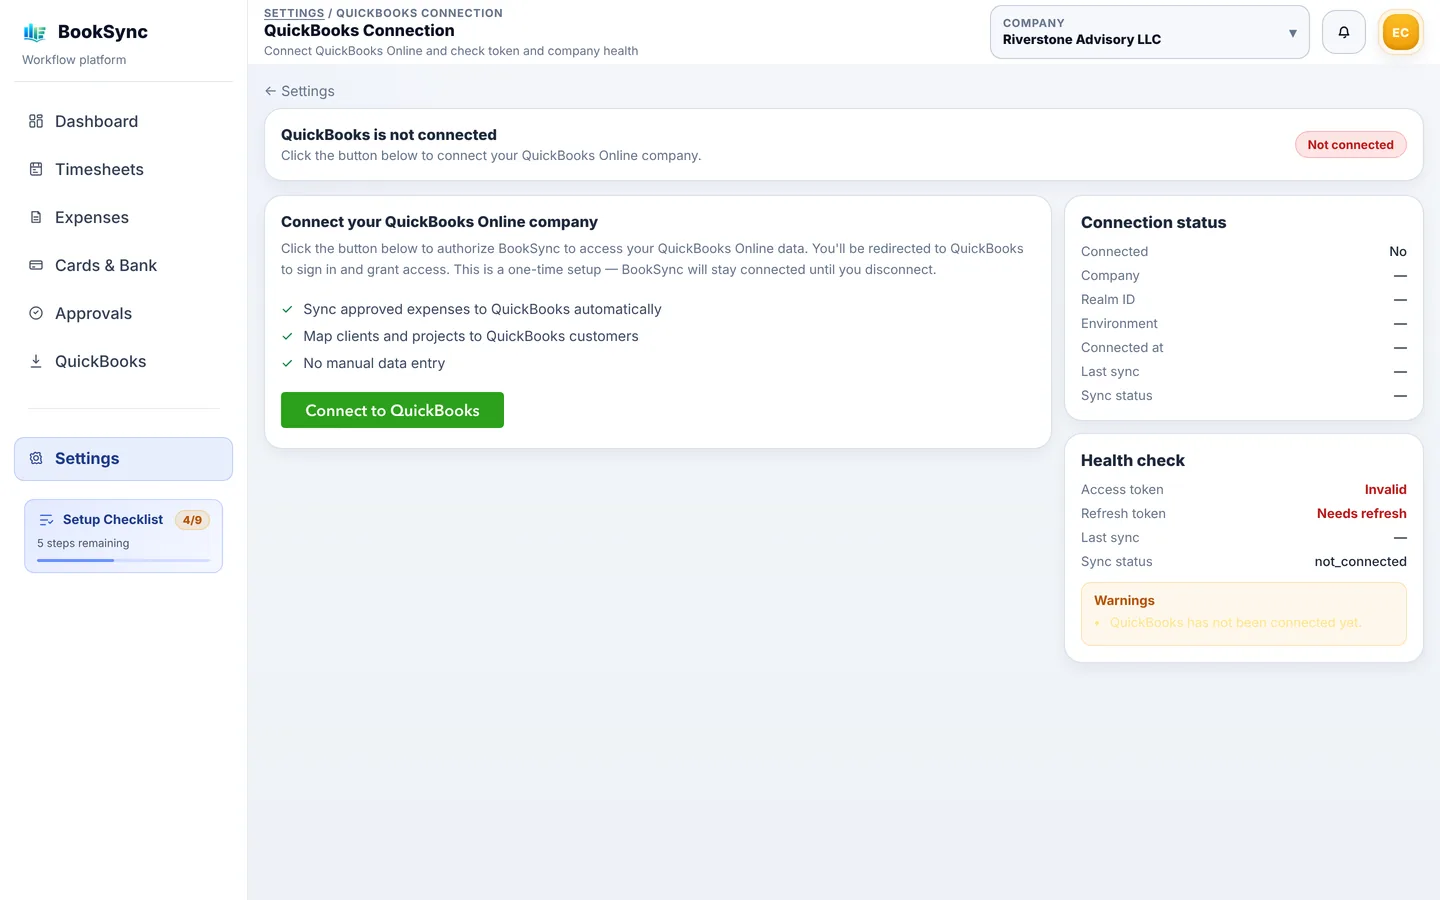
- Go to Settings → QuickBooks Connection and click Connect to QuickBooks.
- On the Intuit page, sign in to QuickBooks, choose the company and allow access.
- Back in BookSync, Connection status shows Connected: Yes and your company name.
- On the same page, choose the cards and bank accounts you pay expenses from (payment accounts). QuickBooks records which account each expense was paid from.
Next, match BookSync to QuickBooks. All of these are under Settings.
| Page | What it does | Required |
|---|---|---|
| Expense Mapping | Links each BookSync expense category to a QuickBooks account. You can also create categories from your QuickBooks accounts | Yes |
| Customer Mapping | Links BookSync clients to QuickBooks customers. Unlinked expenses are posted without a customer | Optional |
| Project Mapping | Links BookSync projects to QuickBooks projects | Optional |
If Health check reports a problem, click Reconnect QuickBooks.
5. Add your team
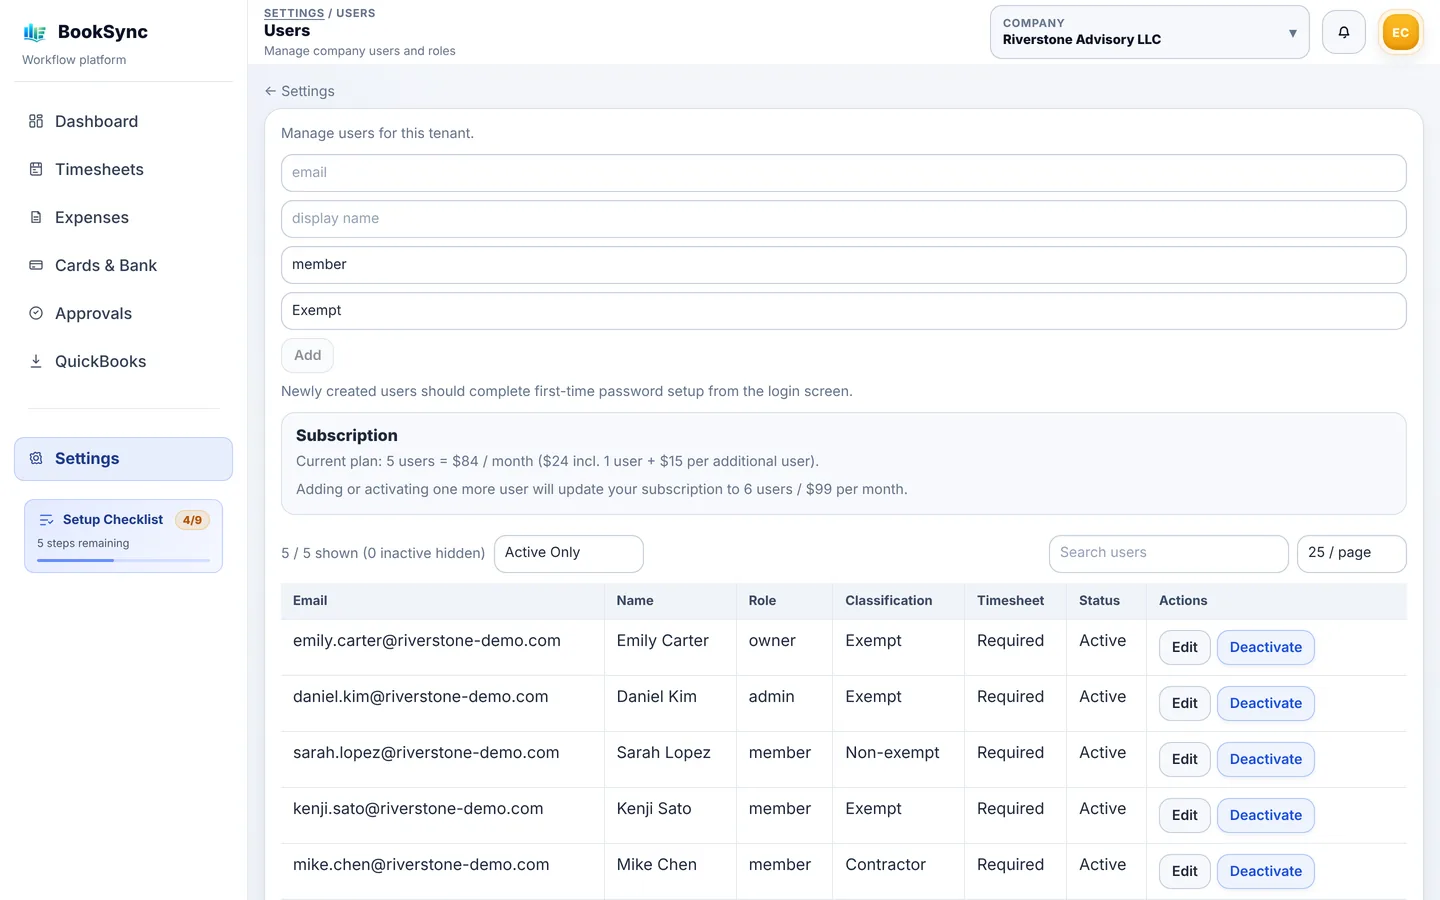
Go to Settings → Users and add people one at a time: email, display name, role and classification, then click Add.
Roles
| Role | Can do | Their submissions are approved by |
|---|---|---|
| owner | All settings and approvals | Time and expenses are approved automatically |
| admin | Settings, and approving members | owner |
| member | Enter and submit their own time and expenses | admin or owner |
Classification: Exempt, Non-exempt or Contractor. Used when time approval is set to Conditional (next section).
Timesheet required: for people who only submit expenses, click Edit and clear Has to fill in. They are not counted as missing and get no reminders.
Pricing: you pay for active users. The Subscription box shows your current price and the price with one more user. When someone leaves, click Deactivate instead of deleting them.
How new people log in: BookSync does not send an invitation email. Tell them to either:
- click First time user / Forgot password? on the login page and set a password with the email you added, or
- click Continue with Microsoft if your company uses Microsoft 365.
6. Set approval rules
If you're not sure, start with Always require approval for both time and expenses. You can change it any time in Approval Policy at the bottom of Company Settings.
This section decides what needs approval. How to approve and send things back is in Approving time and expenses.
Timesheet approval
| Setting | What happens |
|---|---|
| Off | Submitted time is approved automatically |
| Always require approval | All submitted time waits for approval, except time the owner submits |
| Conditional | Only non-exempt people and contractors, and only on days over the limit you set (4–10 hours), need approval. Exempt people and the owner are approved automatically |
Expense approval
| Setting | What happens |
|---|---|
| Off | Submitted expenses are approved automatically |
| Always require approval | Everything waits for approval, except expenses the owner submits |
Post-approval controls
- Allow reject after approval: approved items can still be sent back later
- Allow higher-level override edit after approval: someone in a higher role can correct approved items (expenses already sent to QuickBooks can't be changed)
Two-step sign-in
Two-step sign-in asks for a 6-digit code from an authenticator app (Microsoft Authenticator, Google Authenticator, 1Password and similar) after the password.
- Anyone can turn it on for themselves under My Profile → Two-step sign-in. Save the 10 recovery codes it shows; each works once if the phone is lost.
- The owner can require it under Settings → Company → Sign-in security: Optional, Required for the owner and admins, or Required for everyone. People who are not set up yet are asked to set it up at their next sign-in.
- Lost phone and no recovery codes left? Someone in a higher role clicks Reset two-step on the Users page. The person then signs in with just their password and sets it up again if it is required.
- Continue with Microsoft is not affected. It follows your Microsoft 365 rules.
- After 5 wrong passwords in 15 minutes, sign-in for that email is paused for 15 minutes.
Accounting firm access
If an accounting firm helps with your books, it can open your company in BookSync with its own sign-in.
- Ask the firm for its firm code (8 letters and numbers, like ABCD-2345).
- Go to Settings → Accounting Firm and enter the code. The firm can always look at everything. Tick what else it may do:
- Fix bookkeeping: change the category, vendor, client / project / task, billable mark and memo on expenses and time, approved ones and yours included. The status never changes: approved stays approved.
- QuickBooks work: connect QuickBooks, set up the mappings, send expenses and fix send problems. The firm cannot disconnect QuickBooks.
- Click Add firm. You can change the ticks or Remove the firm at any time.
A firm never approves or sends back, never enters time or expenses, and cannot change amounts, dates, receipts, company settings, invoices, users, your subscription or the two-step sign-in rule. Items already sent to QuickBooks, in a send batch or in a locked month cannot be fixed. A firm never counts as a user on your subscription. Everything it does is recorded under the name of the person at the firm. Only the owner can add, change or remove a firm.
The firm decides which of its people can open your company. The list under Firms with access shows who can right now. If you remove the firm, nobody there can open your company from that moment. A QuickBooks connection the firm set up stays connected: it belongs to your company.
Month lock. The firm can lock a month when the books for it are done (the Lock button on its client list). While a month is locked, nobody (you, your team or the firm) can add, change, approve or send back time or expenses in it. You can still look, and approved expenses can still be sent to QuickBooks. A banner at the top shows who locked it. The owner, an admin or the firm can Unlock it.
7. Tell your team how to start
When you're done, click Mark setup complete in the Setup Checklist. You can click it even with items left; finish them later from Settings.
Your team needs to know three things:
- How to log in (see "How new people log in" in section 5)
- Enter time under Timesheets and expenses under Expenses, then submit them. See Entering time and expenses
- The Guide button at the top right of each page explains that page
For accounting firms
An accounting firm is an ordinary BookSync company with a firm code. Give the code to your clients; each client's owner adds your firm under Settings → Accounting Firm and decides what your firm may do there. Only the client can add your firm.
Your firm can also use BookSync for its own time and expenses. Everything sits under one sign-in: the Company menu at the top lists your firm and the client companies you may open.
Firm Staff (owner only)
Open Firm Staff in the menu. For each person:
- Client companies: No clients, Assigned clients (tick the companies) or All clients (clients added later too). People only see and open the companies they are allowed.
- Firm's own BookSync: on = they use your firm's own time, expenses and approvals, and are billed per person like any company. Off = client work only, free.
Add a person with their email; they sign in with First time user on the sign-in page. New people start on client work only. To change a role or deactivate someone, use Users.
Billing
- Working in client companies is free.
- Turning on the firm's own BookSync for the first person asks for a card (Stripe). It is the same subscription and price as any company, with a 30-day trial the first time. No new company is made.
- One more person: charged from now (prorated). One fewer: the charge goes down from the next billing period. When nobody uses it any more, the subscription ends at the end of the period; client work goes on.
Two-step sign-in
Everyone at an accounting firm must use two-step sign-in with a password, whatever the company setting says. They set it up at their next sign-in.
Activity log for your firm
The firm owner's Activity Log also shows what your staff did in client companies: who opened which client company, when, and which part (expenses, time, QuickBooks and so on), plus changes to which clients each person can open and to the access clients give your firm. This helps with the FTC Safeguards Rule's requirement to monitor and log what authorized users do with client information.
Activity log (owners)
Settings → Activity Log shows who did what, kept for 2 years. Only the owner can see it.
- Sign-ins: successful and failed sign-ins of your company's people, with the address and browser they came from
- Own account: password changes and two-step sign-in turned on or off
- Users: people added, role changes, deactivations, two-step sign-in resets
- Settings: company settings, the two-step sign-in rule, month locks and closes, and accounting firm access
Filter by period, type and person, and use Download CSV to give it to an auditor. Detailed changes to individual expenses and time entries are kept in their own history as before.
Referral partners
BookSync works with referral partners (for example IT consultants or accounting firms) under a partner agreement. This is separate from accounting firm access: a referral partner never sees the companies it referred.
- Signing up with a referral code: enter the code (like REF-ABC234) under Referral code on the sign-up page, or open the partner's sign-up link. It can only be added at sign-up.
- If your company is a referral partner: your code and sign-up link are under Settings → Referral Program, with Copy code and Copy sign-up link.